Create your first vDisk
This walkthrough takes you from a configured master target to a finished vDisk imported into PVS and synchronized across your farm.
Before you start
Make sure PVS Forge is installed and licensed, and that your master target is prepared (joined to the domain, applications installed, PVS target device software present).
1. Configure settings
Open Settings and complete the tabs you need:
- vDisk & Imaging — network speed, optional reboot before imaging, and the PVS import defaults (write cache type and size).
- Notifications (optional) — e-mail / Teams / Slack notification when a job finishes.
- Security — the credentials PVS Forge uses:
- Imaging credentials — used for WinRM to the master targets, store access and sync. By default these are used for everything.
Separate PVS Server credentials only for a tiered setup
Out of the box, PVS Forge uses the imaging credentials for everything, and a
separate PVS Server credentials field is not shown. You only need a
second credential set if the master target and the PVS store sit in
different security tiers. In that case reveal the field by setting
"ShowPvsServerCredentials": true in config.json and restarting. Details:
Settings → Credentials and the tier concept.
2. Add a master target
On the Imaging page, add the master target you want to image by searching Active Directory:
- Type part of the computer name into the search box and press Search.
- Pick the machine from the results — each entry shows the host name, the FQDN, and the organizational unit (OU) it lives in.
- Choose the PVS store the vDisk will be imported into.
The target is added to the job list. You can add several targets and image them in parallel.
The vDisk name is generated for you
PVS Forge names each vDisk automatically in a fixed format —
HOST-DD-MM-YYYY-HHmm (for example SRV04-10-06-2026-1146). The host comes
from the selected computer; the date and time are taken when imaging starts,
so every run gets a unique, sortable name. There is no manual naming schema
to configure.
The fixed name is required: PVS Forge stores companion files next to the VHDX (inventory, hardware layout, seal/unseal log) and links them to the vDisk by this name. A free-form name would break that link.
3. Start imaging
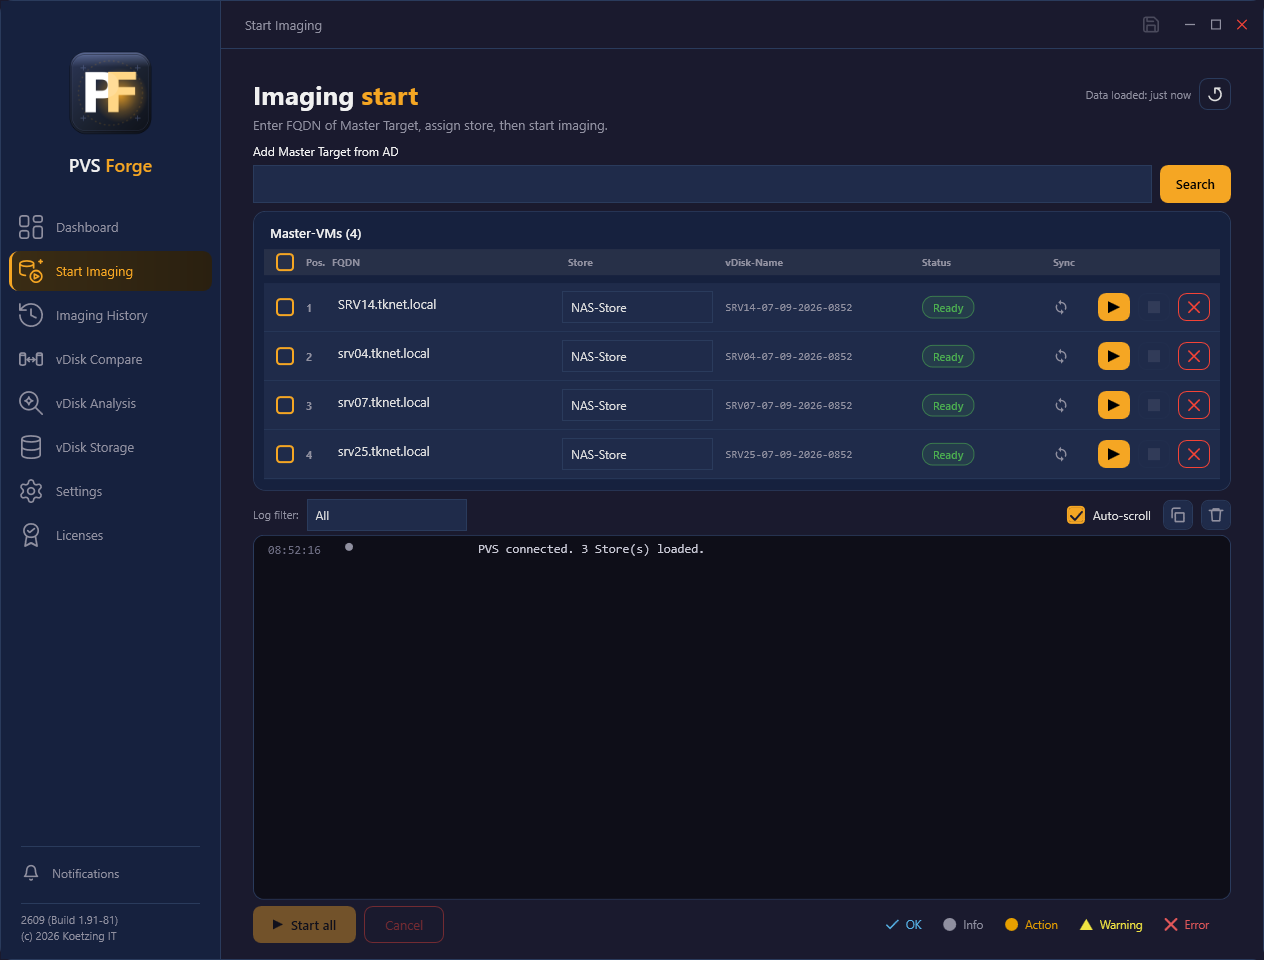
Press Play on a target (or Start all). PVS Forge runs through the full workflow:
- Reachability checks (ping, WinRM, store).
- Optional reboot, pending-reboot check.
- Sealing — disable auto-updates, clear event logs.
- Imaging — PVS Forge captures the disk to a VHDX in the store.
- Unsealing — re-enable updates so the target stays serviceable.
- Inventory capture (software, hotfixes, Citrix, FSLogix, security agents).
- PVS import, write-cache settings, and sync to all servers.
- Notification (if configured).
For a deeper explanation of each phase, see Image Creation.
4. Follow the live log
While jobs run, PVS Forge streams a live log at the bottom of the Imaging
page. Each line is timestamped, and lines that belong to a specific target are
prefixed with the host name in brackets, for example [SRV04].
When you image several targets in parallel, all of their lines appear together in one log. Use the filter dropdown above the log to focus on a single target:
- All (the default entry) — show every line from every target.
- <host name> — show only that target's lines, plus general lines that are not tied to any target.
The dropdown fills automatically with the targets that are currently running and resets to All when a target finishes.
5. Verify the result
When the job reports success:
- The new vDisk appears in your PVS console, imported and synced.
- An inventory file is stored next to the VHDX in the store.
- The vDisk creation is recorded in History with duration, software inventory and the full log. You can review the complete log or the per-vDisk inventory later.
Done
You now have a versioned, documented vDisk ready for production. Next time, saved targets make repeat runs a single click.